Wings Over Europe
copyright © 2006-2008 Third Wire
Productions Inc.
This section provides a short introduction to the major tasks involved
with taking off, finding your target, hitting it, and making a successful
landing. If you're new to flight simulations, these instructions will help
you get started. Even if you're a veteran, you'll find some of the commands
in this section useful.
For a complete list of commands, see Default
Key Commands at the end of this manual.
Taking Off
By default, you start the game in the air. However, you can change the
Mission Start Position setting in the Gameplay Options
Screen to start on the runway.
Taking off is relatively simple. Once you receive clearance from the
tower, you're ready.
- Check to make sure the
flaps are partially extended for take-off. If not, extend the flap to
Take-off setting (press F once).
- Power up your engine
to 100% thrust (press =).
- Release the wheel
brakes (press B).
- Keep the nose pointed
straight ahead using the rudder keys (comma (,) and period (.) keys).
- As you approach the
end of the runway, pull back gently on the joystick to lift the
nosewheel off the ground at about a 10% angle.
- After the aircraft
lifts off the runway and you start climbing, raise the landing gear
(press G).
Navigating
Finding your way around is fairly easy through the use of the Head-Up
Display (HUD). This section assumes that all Gameplay options are set to Easy
or Normal; for Hard settings, you may need to rely on bearings and cockpit
instruments to find your next waypoint.
Your waypoints show up in the Planning Map
before the mission. During flight, your next waypoint shows up either as a
white triangle in your forward view, or as a white cone on the perimeter of
your screen. Steer towards it to maneuver to the next waypoint. Note that you
always have a preliminary waypoint just before the target area or rendezvous
point, and just before landing.
You can select the next or previous waypoint to switch them in
mid-mission. Be aware that violating the planned flight path can consume
precious fuel.
|
W / Shift+W
|
Select next/previous waypoint.
|
|
A
|
Activates autopilot and flies toward next waypoint.
|
|
Alt+N
|
Skips forward in time to the next encounter.
|
|
Alt+M
|
Display the in-flight map.
|
Targeting
Your next order of business is to find and lock onto a target. You can do
this either by bringing a target into view or using your radar. For guided
weapons that require a radar lock, you must acquire a target prior to firing
weapons. Even your gunsight relies on your aircraft's targeting system to
compensate for range and motion.
Visual Targeting
You can select any target you can see out of the front view. A selected
target appears in square brackets on the HUD. If the target moves out of
view, a cone appears to "point" you toward your current target.
|
T / Shift+T
|
Target next/previous air enemy or unidentified target. Depending on your
HUD settings, information may appear onscreen about your target.
|
|
Ctrl+T
|
Target closest air enemy or unidentified target.
|
|
E / Shift+E
|
Target next/previous enemy ground object.
|
|
Ctrl+E
|
Select closest enemy ground object.
|
Radar Targeting
If you have advanced Radar option enabled, and if your aircraft is
equipped with a radar, you can also use the radar to search and track targets
beyond visual range. More specifics of radar usages are covered in Using the Radar.
|
PgUp / Shift+PgUp
|
Switch radar mode - Search / Boresight / Ground Map / Terrain Avoidance.
|
|
PgDn / Shift+PgDn
|
Cycle to next/previous radar range setting.
|
|
Home / Shift+Home
|
Select next/previous radar target on the radar display. (Your radar must
first be in Search mode, and a target must be within radar range).
|
|
Insert
|
Lock on to the currently selected target and go to Target Tracking mode.
|
Using a Weapon
After you have something targeted, you're ready to fire your gun, missile,
or rocket or ready to drop your bomb. Before you can do so, however, you must
select a weapon.
|
Backspace / Shift+Backspace
|
Switch to next/previous Air-to-Air (ATA) weapon.
|
|
Backslash (\) / Shift+(\)
|
Switch to next/previous Air-to-Ground (ATG) weapon.
|
|
Spacebar (or Joystick button 1)
|
Fire primary gun or cannon.
|
|
Enter (or Joystick button 2)
|
Fire/release currently selected missile, bomb, or rocket. (Some guided
weapons may require a lock.)
|
Some weapons require a radar lock, and until it is achieved, you won't be
able to fire the guided weapon. Some heat seeking missiles will sound an
audible tone when locked on. You do not have to keep the target in view after
launch to hit targets with heat seeking weapons.
For radar-guided weapons, you must wait to fire until you see a solid
yellow diamond over the target in the HUD. Whenever you launch a radar-guided
weapon, remember that you must keep the target within the cone of your
radar's view to maintain the lock.
Weapons such as rockets and forward guns don't require a lock and can be
fired whenever you want. Your gunsight is somewhat automated and can help you
aim. Just place the red gun reticle over the target and fire at will. The
system will automatically compensate for your target's range and help you
"lead" the bullets into his path.
Ending Mission
You may end the mission at any time by pressing ESC key. However, if you
end the mission before your mission is accomplished, it will be recorded as a
failed mission.
You may, of course, choose to continue to fly back to your home base and
attempt landing.
Landing
Landing is a bit trickier than taking off because you must control your
angle, descent rate and speed. The main instruments you need to observe are
the airspeed indicator, altimeter and vertical velocity indicator. Jets land
at a high rate of speed, and swept-wing aircraft in particular don't generate
a lot of lift at steep angles of attack.
In general, here's what you need to do to land:
- As you approach the
second-to-last waypoint, begin your lineup with the runway.
- On approach, begin
gently reducing your throttle setting to 25% (press -).
- Press F twice to fully
extend your flaps and gain extra lift.
- Press G to lower your
landing gear.
- Keep the nose angled
up at about a 10 to 15degree angle.
- Keep your airspeed
between approximately 150 and 200 knots and stay on course with the
runway. You should descend at about 500 or 600 feet per minute.
a. If you need to slow down, pull back slightly on the stick to raise
the nose.
b. If you need to speed up, lower the nose slightly.
c. If you need to increase your descent rate, reduce the throttle.
Conversely, increase the throttle to decrease the descent rate.
d. You can also temporarily apply the airbrake to slow down (press S to
toggle it).
e. If you run into real problems, switch on autopilot for a safe landing
(press A).
- At about 100 feet
above the runway, flare by pulling back gently on the stick. This lowers
the rate of descent and executes a soft landing. (Be careful, as raising
the nose too high may result in the engine nozzle hitting the ground
first!)
- After touchdown,
reduce throttle to 0% (press -).
- Engage the wheel
brakes (press B).
- Press ESC to end the
mission.
Every successful mission starts with a good plan. Wings Over Europe
offers a variety of entertaining mission types, including instant action,
single missions, a full campaign and multiplayer games. But before you rush
to suit up and get off the ground, you've got to properly equip your aircraft
for the task at hand.
Your journey into the skies starts on the ground, beginning with the Main
Screen. From there, you select a pilot (except for Instant Action) and a
mission type. After you study the mission briefing, you can then memorize your
waypoint route and outfit your bird with fuel, bombs, missiles and guns.
Finally, you'll be ready to take on the best strategic maneuvers your foes
have to offer.
The first thing you see when you start the game is the Main Screen. Here,
you select what type of mission you want to fly. You can also view statistics
for the current pilot or another pilot you've previously saved.
The Main Screen lists the following options. Click a button to access that
screen.
|
Instant Action
|
Jump immediately into flight in a randomly generated mission.
|
|
Single Mission
|
Load a historical mission, or configure a new mission and fly it.
|
|
Campaign
|
Load the currently active pilot and campaign, or start a new campaign
with a different pilot.
|
|
Pilot Record
|
View vital statistics for all of your saved pilots, or create a new
pilot to man your aircraft
|
|
Options
|
Set
options for gameplay, graphics, sound, controls, network and other
miscellaneous options.
|
|
Exit
|
Closes
the game.
|
|

|
Displays
a small menu that allows you to view other screens, see the credits, and
quit the game. The small green aircraft icon in the upper left corner
appears on every base screen and has quick links to the Main Screen, Pilot
Record Screen and Options Screen. You can
also select Quit to close the game.
|
Jump into the cockpit and quickly engage enemy targets in an Instant
Action mission.
When you select Instant Action from the Main Screen, you immediately find
yourself high in the air near enemy territory. In some cases, you may even
find yourself doggedly evading a bandit who's on your tail. With an Instant
Action mission, you don't get to choose your aircraft, enemies, or setting -
it's a surprise each and every time you enter battle. You also don't have to
deal with takeoffs and landings.
At the end of each Instant Mission - after winning, crashing, or dying -
you see the Debrief Screen.
Create and fly randomly generated missions, or fly historical missions.
When you click Single Mission in the Main Screen, you're able to select a
specific set some parameters for the mission. Another difference between a
Single and Instant Mission is that the results of Single Missions are saved
to your pilot's permanent record.
You have several options in the Single Mission Screen. The left side of
the file folder shows two buttons, and the right side displays the parameters
for the selected subscreen.
|
New Mission
|
Configure a new mission. (The game remembers the last settings you
used.)
|
|
Load Mission
|
Load a custom mission or a previously saved mission. You can select a previously
saved mission from the Mission Filename list.
|
|
ACCEPT
|
Once the mission is configured or loaded to your satisfaction, click
Accept to move to the Hangar Screen.
|
|
EXIT
|
Return to the Main Screen and cancel this
mission.
|
New Mission
Parameters
Setting different mission parameters can drastically affect the difficulty
of a mission. For instance, it's going to be harder to fly a reconnaissance
mission when there is heavy enemy air activity, and if you want to up the
ante for your pilot, try setting up heavy enemy air activity and heavy enemy
air-defense activity.
You can alter the following options for a new Single Mission:
|
Aircraft Type
|
Select an aircraft to fly on this mission - the F-100D Super Sabre,
F-105D Thunderchief, F-4C Phantom II, F-4D Phantom II, F-4E Phantom II,
F-4F Phantom II, AV-8A Harrier, Harrier GR.Mk 1, Harrier GR.Mk 3, Hunter
FGA.Mk 9, Phantom FGR.Mk 2, A-10A Thunderbolt II or F-15A Eagle.
|
|
Mission Date
|
Select a specific year for this mission. Different weapons became
available at different date, so select a later year to make more advanced
weapons available. (this applies to both friendly and enemy weapons!)
|
|
Mission Type
|
Select a mission type - Random Mission (program randomly picks a
mission), Fighter Sweep, Combat Air Patrol, Intercept, Escort, Strike,
Close Air Support, Air Defense Suppression, Armed Reconnaissance,
Anti-Ship, or Reconnaissance. (See Mission Types
for details on different mission types.
|
|
Mission Map
|
Select a specific map and terrain type – Germany is the game's primary
map.
|
|
Mission
Start Time
|
Select
a time of day for the mission - Random / Dawn / Morning / Noon / Afternoon
/ Evening / Dusk / Night.
|
|
Mission
Weather
|
Set
the weather conditions - Random / Clear / Scattered / Broken (partly
cloudy) / Overcast / Inclement (stormy).
|
|
Enemy
Air Activity
|
Select
the approximate level of enemy activity for the mission- Random / Light /
Normal / Heavy. This sets the number of airborne enemies you'll likely
encounter during the mission.
|
|
Enemy
Air Defense
|
Select
the approximate level of enemy ground-based anti-aircraft units you'll face
during the mission - Random / Light / Normal / Heavy.
|
Participate in a full-length war and fly dynamic campaign missions.
The Campaign Screen allows you to start a new campaign mission series, or
load an existing campaign that you've created. Once you begin a new campaign,
you can't change the pilot you're using for that particular campaign.
However, you can start a new campaign with a different pilot.
Two buttons appear on the left side of the screen. When you select one,
the right-hand page changes to reflect your chosen option.
|
New Campaign
|
Starts a new campaign. After you choose this option, set the campaign parameters
and then click Accept. When prompted, enter a save name for the new
campaign.
|
|
Load Campaign
|
Enables you to load a saved campaign. Select the campaign you want to
load from the drop-down list on the right-hand side of the screen, then
click Accept.
|
|
ACCEPT
|
Prompts you for a campaign name and saves the new campaign, then
displays the Hangar Screen.
|
|
EXIT
|
Returns you to the Main Screen and cancels
the campaign mission.
|
New Campaign
Parameters
When you opt to create a new campaign, you can set the following options:
|
Pilot Name
|
Displays a list of pilots you've created. Select one to associate that
pilot with this campaign. That pilot will still be able to fly Single
Missions.
|
|
Campaign Name
|
Displays a list of available campaigns.
|
|
Service
|
Displays the available service branches by nationality.
|
|
Unit Name
|
Displays a list of available squadrons. The list varies, depending on
which service branch you select.
|
|
Campaign
Difficulty
|
At
the Easy level, your success has less effect on the success of other units
involved in the campaign war. If you perform poorly, other battle areas can
still achieve overall success. The opposite is true for Hard campaigns -
your performance guides the overall performance for your side. Normal falls
somewhere in between.
|
|
Campaign
Length
|
Determines
the maximum number of missions for the campaign - Short / Normal / Long. A
short campaign ends at about half the normal length campaign (exact mission
number varies depending on the campaign, usually around 30) and a long
campaign does not end until double the normal number of missions have been
played.
|
|
Aircraft
Supply
|
Controls
how often your base receives supplies, and how many supplies are delivered
- Limited / Normal / Unlimited. Limited resupply means that you're much
more likely to run out of aircraft and weapons before the next convoy
arrives. Normal gives you slightly more aircraft and weapons, and Unlimited
means that you never need to worry about running out of supplies.
|
|
Weapon
Supply
|
Acts
similarly to aircraft supply - Limited / Normal / Unlimited.
|
The Hangar Screen is your pre-flight area. From this area you can review
the mission briefing, alter your aircraft's ordnance loadout, view and adjust
your mission waypoints, and select a pilot for the mission. The main Hangar
Screen page shows an abbreviated mission briefing. Along with your squadron,
callsign and aircraft information, it also displays the current date (in game
time). Planned takeoff, target arrival and landing times for the mission
appear as well in 24-hour military time.
The Hangar Screen contains six buttons, four of which activate subscreens.
|
Briefings
|
Displays an extended mission briefing for the current mission, including
situational information, an intelligence briefing and detailed mission
instructions.
|
|
Loadout
|
Lets
you proceed to the Loadout Screen and adjust weapon and fuel settings for
up to four aircraft in your wing. You can also customize your aircraft's
appearance in the Loadout area and, in some mission types, select the type
of aircraft you want to fly.
|
|
Planning Map
|
Shows
the Planning Map Screen, where you can view and adjust waypoints. You can
also see all friendly and some enemy positions in this area, along with
basic aircraft and base information.
|
|
Pilot Roster
|
Shows the pilot assignments for this mission.
|
|
EXIT
|
Returns you to the previous screen (Single
Mission or Campaign).
|
|
FLY!
|
Puts you into the cockpit and starts the mission.
|
The Briefing Screen is accessible from the Hangar Screen and shows all
mission plans and available intelligence relating to your next sortie,
detailing your objectives. The information that appears in the Hangar Screen is a summarization of the material
that appears here.
In the Loadout Screen, you equip your aircraft with ordnance appropriate
for the selected or assigned mission type, whether it's a Single Mission or
the next mission in a Campaign game. (See Mission
Types for information about different types of missions you can fly in
the game.) You can view or configure your own aircraft, as well as that of
your wingman and any other aircraft flying with you.
The functionality of this screen differs slightly depending on what type
of mission you're flying and what branch of the military you choose. Single
Missions allow you a little more flexibility than Campaign Missions, since
your aircraft, callsign, squadron alignment and aircraft appearance are
configurable. (These items are not editable for a Campaign mission.)
The top right side of the screen has a number of drop-down lists. The
lower right side of the screen details the current aircraft weight
(calculated by adding the fuel, ammunition and external weapon weights to the
raw weight of the aircraft).
You can set the following options in the Loadout Screen for all aircraft
involved in your flight. When you're finished with all of the loadouts, click
EXIT to return to the Hangar Screen. When you
re-enter the Loadout Screen, the settings for your aircraft display by
default.
|
Callsign
|
Displays a list of each individual member of your flight. Your aircraft
is always designated by "1-1", and that of your wingman by
"1-2." Select a callsign entry to configure the loadout for that
particular aircraft.
|
|
Aircraft
|
For
Single Missions, this drop-down list lets you assign an aircraft type to the
currently selected callsign. For Campaign missions, the aircraft type is
fixed, but you can adjust loadouts as needed. Also note that in Campaign
missions you start with a limited number of weapon stores and aircraft.
Periodically, your base is resupplied with new munitions and aircraft. The
best way to ensure that this happens in a timely manner is to successfully
complete all escort missions for incoming supply vehicles.
|
|
Number
|
Displays
a drop-down list of individual serial numbers for each aircraft of the
selected type. This unique number identifies each individual aircraft on
the base.
|
|
Paint Scheme
|
For Single Missions, sets the chosen aircraft's paint job. A small
sample of the selected scheme appears to the right of this drop-down list.
|
|
Markings
|
For Single Missions, displays a drop-down list of national military air
force emblems for your aircraft.
|
|
Squadron
|
For Single Missions, enables you to select squadron markings, which will
appear on the exterior of your aircraft. In a Campaign game, your squadron
is predetermined.
|
The Planning Map Screen shows an overhead view of the mission area,
complete with color-coded icons that represent friendly and enemy units. You
should use this screen to become familiar with the navigation layout of the
mission, the enemy line, and the type and number of known foes.
The map shows the following elements of information for each mission. You
can click-and-drag anywhere on the map to scroll in any direction.
|
Chalkboard
|
Displays basic information about the mission, target area and base. This
area also displays waypoint and unit information, as described below.
|
|

|
Blue
icons represent friendly air and ground units, and red icons denote enemy
units. The type of unit appears as an image on top of the icon. When you
move the cursor over a friendly or enemy unit icon, known information about
that unit appears on the chalkboard, including the unit type, number of
units and home base. As you win more Campaign missions and gather more
intelligence, you'll be able to spot more targets and view more information
about them in this screen.
|
|

|
The
small yellow triangles indicate waypoints for your flight. All aircraft
flying with you follow these waypoints. Although the set waypoints are
optimal for the mission, you can click-and-drag these waypoints to
different locations. Be aware that extending the mission path requires
additional fuel. Whenever you move the mouse pointer over a waypoint
triangle, details about that navigation point appear on the chalkboard.
|
|
Battle line
|
The red, jagged line on the terrain indicates the front line of battle.
As you progress through the Campaign, this line will move to reflect your
success or failure.
|
|
Target area
|
The black circle surrounds the area containing the main mission target.
If you're having trouble winning a particular mission, you can try entering
the target area from a different point.
|
|

|
The magnifying glass icons allow you to zoom the map view in (+) and out
(-). The icon with the dashed outline re-centers the map over the target
area.
|
|
EXIT
|
Returns
you to the Hangar Screen.
|
The Pilot Roster screen lists the current game date, as well as the type
of aircraft being flown and the names of all pilots involved in the current
flight. Pertinent information about each pilot's experience, success and
current condition also appears here. Note that pilots not involved in this
mission do not appear on this screen.
Click EXIT to return to the Hangar Screen.
The following information displays for each pilot:
|
Pilot
|
Shows the pilot's first name, last name and current military rank.
|
|
Combat
Missions
|
Displays
the total number of combat missions flown by the pilot.
|
|
Kills
|
Tallies
the number of Air-to-Air (A/A) and Air-to-Ground (A/G) kills made by the
pilot.
|
|
Status
|
States whether the pilot is available for duty or not. During a Campaign
game, the game tracks the status of all pilots in your squadron. As they
get shot down, they can become KIA (killed in action), MIA (missing in
action), or POW (prisoner of war) and will no longer be available to fly
the mission. Pilot replacements are flown in on a semi-regular basis.
|
|
Morale
|
Describes the current morale level for the pilot.
|
|
Condition
|
Describes the current physical condition of the pilot - Fatigued,
Normal, Rested and Refreshed. Refreshed is the highest level available
|
|
Aircraft
Assigned
|
Lists
the callsign for the pilot's current aircraft assignment.
|
Anytime you complete a mission, die, or press ESC, the Debrief Screen
appears. From here you can view your score for the mission, the length of the
mission, the success/failure message and a Top 10 score list. You will also
view any new medals you receive as a result of earning points for that
mission.
You have several other options in this screen. From any other post-mission
screen, you can click Debrief at any time to return to the mission summary.
|
Stats
|
Shows who fired what weapons during the course of the mission, the
number of launches/rounds, the number of successful hits and the percentage
rate of success. Finally, a kill tally also appears for each pilot involved
in the mission.
|
|
Log
|
Here,
every event that occurs during the mission is logged and time-stamped.
|
|
REFLY
|
Fly
this same mission again.
|
|
ACCEPT
|
Save the mission score for the currently selected pilot and return to
the Main Screen.
|
View detailed pilot records containing a complete history and statistics
for your pilot.
This screen shows a detailed record for the currently selected pilot. For
each pilot, you can choose to view the individual record or the record for
multiplayer play.
|
Pilot
Name
|
Displays
a drop-down list of all saved pilots. Select a pilot to display his or her
information on the right side of the screen.
|
|
Photo
|
Displays
a drop-down list of available pilot photos. You can add to this list by
placing additional *.BMP images in the PilotData folder in the game
directory
|
|
Last
/ First Name
|
Lets
you type in a name for your pilot.
|
|
Callsign
|
Lets
you type in a callsign or "handle" for your pilot.
|
|
EXIT
|
Returns
you to the Main Screen.
|
Pilot Statistics
The rank, score, ratings and missions that appear in the right-hand box
reflect the pilot's accumulated scores. When you click the Pilot Record
button all missions flown in single-player modes are calculated into these
results. When you click the Multiplayer Record button only multiplayer
missions are considered.
The following stats appear for the selected pilot:
|
Rank
|
Shows
the current military rank. As you earn points with this pilot, you earn
medals and advance in rank
|
|
Score
|
Shows
the cumulative score. You receive points for each mission based on success
in achieving the objectives.
|
|
Rating
|
Overall
rating of the pilot.
|
|
Total
Kills
|
Shows
the kill tally (number of enemies destroyed)
|
|
Aircraft
|
Breaks
out the number of aircraft kills.
|
|
Vehicle
|
Breaks
out the number of vehicle and ground unit kills.
|
|
Buildings
|
Breaks
out the number of building destroyed..
|
|
Friendly
Fire
|
Shows
the number of friendly objects destroyed (hopefully accidentally!) by the
pilot
|
|
Shot
Down
|
Number
of times the pilot was shot down.
|
|
Kill
Ratio
|
Ratio
of kill tally divided by number of times shot down.
|
|
Flight
Hours
|
Shows
the total hours flown by this pilot.
|
|
Last
Flown Type
|
Shows
the last type of aircraft flown by this pilot.
|
|
Missions
|
Displays
the total number of missions flown, the number of missions that was
successful, and percentage of missions success.
|
|
Campaigns
|
Shows
the total number of campaigns flown, the number of campaigns won, and the
percentage of campaigns won.
|
Adjust various game settings such as gameplay, graphics, sound and
controls options.
You can change many of the game's options by setting them in the Options
Screen. To access the options from anywhere in the game prior to flight,
simply click the green aircraft icon in the upper left corner of the screen,
and then click Options.
Note: You cannot reset options while you're airborne.
You have access to four Option Screens - Gameplay,
Graphics, Sound, and Control. Click on the name of a section to jump to that
option category.
EXIT Takes you back to whichever screen you were in prior to accessing the
Options Screen.
The Gameplay subscreen lets you change difficulty settings that affect how
hard or easy the game is to play.
|
Mission
Start Position
|
Position
of your aircraft when the mission starts - Near Target / Air / Runway. This
determines whether you begin the game in the air or not, and how close you
are to the target objective.
|
|
Default
Viewpoint
|
Your
perspective when the mission starts - External / Cockpit. An external view
positions you so that you see the outside of your aircraft; a cockpit view
seats you behind the controls. See Key
Commands for details on how to change camera views.
|
|
Display
Unit
|
Sets
the unit of measurements used for display - Default / Metric / English.
Metric uses standard units of meters and kilometers. English uses feet,
nautical miles and knots. Default selects the unit based on the aircraft
type -US and British aircraft use English unit, while most other aircraft
use Metric.
|
|
Enemy
Skill Level
|
Skill
of your opponents - Easy / Normal / Hard. Easy: Enemies aren't all that
accurate - they'll fire less often and miss more often. Also, their flying
skills are below average. Medium: Opponents are a slightly better shot at
range and are better at executing combat maneuvers. Hard: Opponents are
seasoned veterans who pick their shots carefully and are fairly accurate.
Dogfighting these enemies won't be an easy task, offensively or
defensively.
|
|
Simulation
Difficulty
|
Overall
difficulty of the game, based on a number of option settings - Easy /
Normal / Hard / Customize. Click Customize to display additional drop-down menus
and options (listed below). For all of the customizable options, you may
select Easy / Normal / Hard. The default setting is Normal.
|
|
Options
under Customize...
|
|
|
+
Flight Model
|
Controls
the flight model for the aircraft. Easy: Arcade-type flight model. You have
a lot of flight control due to limited external aerodynamic forces and the
aircraft flies where the nose is pointing. Normal: More accurate flight
model. No true stalls or spins exist, but you must deal with some external
aerodynamic forces. Hard: Most complex flight model. External forces can
cause you to stall out or enter an unrecoverable spin. Realistic flight
control limits make the diagonal motion of the joystick less useful for
rolling during high angle-of-attack (AoA) maneuvers.
|
|
+
Weapon Effectiveness
|
Controls
behavior and realism of weapons. Easy: Guns and weapons are very effective.
Even the simple nose cannon can penetrate armor. All weapons have a wide
blast radius and will not malfunction, so you need less accuracy when
aiming at your target. Normal: Cannon rounds will still puncture armor, but
otherwise guns and weapons do normal damage. Missile launch parameters
exist, and missiles may malfunction if fired outside of those parameters.
Hard: Gun and cannon rounds observe armor resistances, so attacking the
front of a tank with a gun is a moot point. Strict missile parameters
exist. Some missiles have a built-in, realistic firing delay of up to two
seconds.
|
|
+
Radar Display
|
Controls
the realism of the radar control and display. Easy: The radar automatically
marks targets as friendly or enemy. Additionally, you have a 360-degree
view of the area - no blind spots exist. Normal: The radar has a limited
forward front view and uses realistic ground clutter and return signals.
Targets remain on the radar screen as long as they remain in the cone of
view. The radar automatically tracks targets as soon as they move into
radar range. Hard: The radar realistically displays targets as momentary
blips. It can take 6 seconds or longer to enter tracking mode, depending on
the strength of the radar signal and the proximity of the target.
|
|
+
Visual Targeting
|
Controls
how targets are identified and selected. Easy: You can target anything,
even things you cannot see, and all targets are marked as friendly or
enemy. Normal: You can only target objects that are within visual range and
not obstructed by mountains, clouds or other objects. All targets are
marked as friendly or enemy. Hard: Target identification does not
automatically occur, and you must fly close enough to an object to
determine whether it is friendly or enemy. You can only target objects
currently in your viewing range.
|
|
+
HUD Display
|
Controls
how the game's head-up display (HUD) operates. Easy: All available
information displays on the HUD, including flight information, target
information and waypoints. The targeting square shows the target's type,
alignment and range. Normal: You can only view target flight information when
you have the target within proper radar range. The targeting square doesn't
show the target's type, alignment or range. Hard: Your flight information
and waypoint information are the only elements that display on the HUD.
Target information does not appear.
|
|
+
Landing
|
Controls
how difficult it is to land the aircraft. Easy: If you lower the gear, you
land successfully. Speed and angle are not factors. Normal: If you lower the
gear and don't come down too steeply or too fast, you land successfully. If
the descent rate is too high, however, you may crash. Hard: You must
descend at the correct angle and speed to make a successful landing.
Violating landing parameters may result in gear damage or collapse, or even
worse, a crash.
|
|
+
Collision
|
Controls
mid-air collisions and collisions with the ground. Easy: You cannot collide
with another aircraft in the air. Also, crashing into the ground doesn't do
any damage. Normal: You cannot collide with friendly aircraft, but you can
hit an enemy. Damage from collisions is reduced, and you won't usually die
as a result. Hard: You can collide with both friendly and enemy aircraft.
If you crash into the ground, you will probably die.
|
|
+
Blackout
|
Controls
physical effects of gravitational forces (G-forces) that occur as a result
of quick turns. Easy: Blackout and redout never occur. You can push or pull
as many negative or positive Gs as you like. Normal: You may experience
redout and blackout during excessive G-forces. However, the effects are
short-lived. Hard: Blackouts and redouts occur under realistic
circumstances, and the side effects remain active longer.
|
|
+
Ammo Usage
|
Controls
the rate at which ammunition is expended. Easy: You have an unlimited
supply of gun ammunition, cannon rounds and missiles. Normal: You can run
out of ammunition and armament, but you start out with twice as much. Hard:
You carry a realistic amount of ammunition, and you can only use your guns
for a few short bursts.
|
|
+
Fuel Usage
|
Controls
how quickly the aircraft consumes fuel. Easy: Your fuel supply is infinite,
even when you use afterburners. Normal: Fuel is consumed at half of the
normal rate during regular flight, and slightly less than the normal rate
when you're using afterburners. Hard: Fuel consumption is realistic, and
you can't use afterburners very much without risking a fuel shortage later
in the mission.
|
The Graphics subscreen allows you to change options that affect video
settings. In general, the fewer textures and less detail you specify, the
better the game performance. Older, slower machines operate best at lower
graphical settings. If you have a top-end system, you can leave everything on
the highest setting and enjoy increased video quality.
Medium settings are generally recommended for machines that meet the
minimum system requirements. However, if the video is jerky or slow, try
disabling some of these settings or lowering the detail levels.
|
Display
Device
|
Specifies
which video card the game should use. Normally only one video card will be
listed here. If multiple cards appear, choose the option that corresponds
to your 3D video card.
|
|
Display
Resolution
|
Sets
the resolutions for your monitor during gameplay. The list that appear here
are different, depending on which video card you have installed. If you're
having performance problems, you can reduce the game's resolution setting.
|
|
Display
Aspect Ratio
|
Sets
the aspect ratio for your monitor, 4:3, 5:4, 16:9, or 16:10. Standard CRT
monitors typically have 4:3 or 16:9 ratio, while newer LCD monitors
typically have 5:4 or 16:10 aspect ratio.
|
|
Lens
Flare
|
Sets
whether or not you see a blinding "lens flare" effect (multiple
halos) when you are flying in the direction of the sun. Your options are as
follows - Always On / On External Views / Always Off. Choosing the second
option means that you won't see any lens flares while viewing action from
inside the cockpit.
|
|
Graphics
Detail Level
|
Overall
level of graphics details you see during flight, based on a number of
option settings - Low / Normal / High / Unlimited / Customize. Click
Customize to display additional drop-down menus and options (listed below).
These settings greatly affect frame rate.
|
|
Options
under Customize...
|
|
|
+
Object Detail
|
Controls
level of detail and distance limits for 3D objects. Low: Fewer polygons
exist for each object. Some visual effects such as reflections and decals
are turned off. Medium: Objects have more art polygons and appear more
detailed at close range. High: Objects appear highly detailed both at range
and up close. All visual effects and decals are turned on.
|
|
+
Object Texture
|
Controls
the level of texture detail for objects. Low: Object textures are limited
to 128x128 detail. Medium: Object textures are limited to 256x256. High:
Object textures are limited to 512x512. Unlimited: Object textures have
unlimited detail.
|
|
+
Cockpit Texture
|
Acts
identically to object textures, but applies only for the 3d virtual cockpit
model.
|
|
+
Cockpit Mirrors
|
Toggles
the rearview mirror on/off. When active, this option significantly slows
down your frame rate, as each scene must be rendered twice.
|
|
+
Cockpit Reflection
|
As
above, but toggles the transparent, interior cockpit reflections on the
canopy glass on/off.
|
|
+
Shadow
|
Controls
the distance and type of object that can cast shadow. Low: No shadows are
cast. Medium: Aircraft cast shadow only in external view and only at close
range. High: Aircraft and some ground objects cast shadow. Unlimited: All
objects cast shadow at furthest distance.
|
|
+
Effects Detail
|
Controls
the detail level for special effects, such as smoke, fire and explosions.
Low: Visual effects are short-lived and don't have much particulate detail.
Medium: Particle effects are denser, and visual effects last longer. High:
All effects are shown at full detail, and the effects remain onscreen for
longer.
|
|
+
Terrain Detail
|
Controls
how detailed the terrain appears at various distances. Low: Terrain is
represented as a simple mesh. Medium: Terrain shows more hills and valleys.
High: Terrain is at highest detail.
|
|
+
Terrain Texture
|
Controls
the level of texture detail for terrain. Low: terrain textures are limited
to 128x128 detail. Medium: terrain textures are limited to 256x256. High:
terrain textures limited to 512x512. Unlimited: terrain textures have
unlimited detail, and have additional noise detail added (with proper
Shader support).
|
|
+
Horizon Distance
|
Determines
the distance to the horizon - Near / Normal / Far / Unlimited. Note that
this only affects terrain. Enemy object and aircraft visibility distances
are not affected.
|
|
+
Ground Objects
|
Controls
how many objects (such as trees and buildings) appear on the ground. Low:
Only important ground targets and buildings are displayed. Medium: Some
trees and non-mission critical buildings also appear. High: All trees and
buildings appear on the ground.
|
|
+
Water Detail
|
Controls
how water is rendered. Low: Water texture is rendered just as normal
terrain texture. Medium: Water texture has specular highlights and appears
shinier. High: Water texture is animated (with proper Shader support).
|
The Sound subscreen lets you change audio options for the game and any
external speakers you have attached to your computer.
To adjust the volume slider bars, click on the desired part of the bar.
You can also click-and-drag the slider left to reduce volume, or right to
increase volume.
|
Sound
Volume
|
Adjusts
the main master sound level for the game.
|
|
Speech
Volume
|
Changes
the volume of in-flight radio conversations.
|
|
Music
Volume
|
Changes
the volume of the in-game music.
|
|
Sound
Channels
|
Sets
the number of sound channels to use - 8 / 16 / 24 / 32. The higher the
setting, the richer the sound.
|
|
Stereo
Speakers
|
Setup
Sets the speaker direction - Normal Stereo / Reverse Stereo. Switch the
setting to reverse the left and right speakers in the game.
|
|
Speech
Subtitles
|
Toggles
subtitles on and off for all radio speech.
|
The Control subscreen lets you adjust your joystick's sensitivity and
deadzone settings.
|
Joystick
Sensitivity
|
Changes
how responsive your joystick is to movement. Slide the bar left to reduce
sensitivity, or right to increase sensitivity.
|
|
Joystick
Deadzone
|
Adjusts
the non-responsive area of the joystick around the center position. Slide
the bar left to reduce the amount of "dead" space, or right to
increase it. A low deadzone value means that a slight joystick movement has
a greater effect on your movement than the same movement with a high
deadzone value.
|
|
Customize...
|
Change
key mappings in this screen. The default control list is loaded by default,
but you can click Customize to change the key mappings. If you choose to
customize, a new *.INI file will be saved in the Controls subdirectory
under the main game folder. You can then select the control list you want
by clicking the drop-down list and choosing a key mapping option.
|
This section covers the basic forces that operate on your aircraft, gives
an overview of the cockpit and its instruments, illustrates some basic combat
maneuvers and how to use weapons, as well as providing details about all the
aircraft found in the game.
Forces
Four forces operate on all aircraft: lift, gravity, thrust and drag. It is
the combination of these forces that allows a plane to fly.
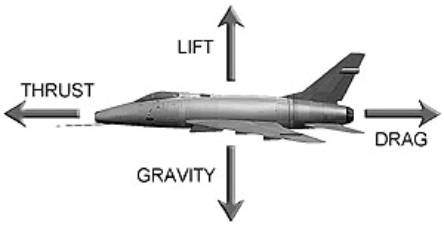
Lift keeps an aircraft airborne, and is mostly generated by airflow over
and under the wings. A lot of factors are involved in how much lift is
present at any given moment, including a plane's airspeed, the shape and
position of its wings and their angle of attack. Gravity, on the other hand,
is always constant and is the force counteracting lift, trying to pull an
aircraft straight towards earth, no matter its orientation. The balance
between these two determines whether an aircraft ascends or descends in level
flight.
Thrust propels an aircraft forwards and is adjustable by throttle. In jets
it is generated by turbojet engines and afterburners, if so equipped. It is
counteracted by drag, the amount of friction a plane's shape must overcome
when flying through the air. Thrust and drag are affected by a number of factors,
including air density, variable at different altitudes.
Axes of Movement
and Controls
Aircraft have three axes of movement: pitch, roll and yaw. Each has a
corresponding flight control surface. Sufficient airflow over these control
surfaces allows a pilot to "steer" a plane in an individual or a
combination of axes.
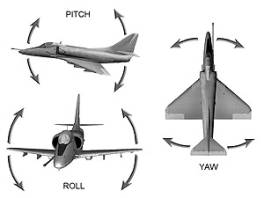
Pitch is the angle of the nose of a plane relative to the ground and is
controlled by an elevator or an all-moving horizontal stabilizer (found to be
more effective as aircraft approached high subsonic and supersonic speeds).
Elevators and moving tail surfaces are found at the rear of an aircraft and
are controlled by pushing the flight control stick forward or pulling it
backward. This is the quickest and most effective way to make your plane's
nose point up or down.
Roll is a rotating movement on the longitudinal axis running through the
center of a plane from front to back, also known as bank. When an aircraft
banks, one wing rises or lowers relative to the other. Roll is operated by
ailerons, found on the trailing edge of each wing. These are activated by
pushing the flight stick from side to side. If you want to change your aspect
from right side up to inverted - or any position in between - use the
ailerons.
Yaw is movement of the nose on a horizontal plane, much like the steering
of a car. Yaw is controlled by the rudder, a vertical airfoil found on the
tail of a plane. It is operated by a set of pedals, which also control the
nose wheel when on the ground. In aircraft with a high sweepback to the
wings, the rudder can also be used to initiate roll when the wings are at a
high angle of attack and ailerons prove ineffective.
Inertia
Following Newton's First Law of Motion, which states that "an object
at rest tends to stay at rest and an object in motion tends to stay in
motion," objects also naturally resist a change of state to their motion
(velocity); this resistance is called inertia. The more mass that an object
has, the greater the effect of inertia. How this applies to aircraft is that
they will tend to resist a change to their path of movement, despite the
pilot moving the controls. That is, the vehicle's momentum will want to
continue to carry it along its center of mass's original path. While an
aircraft's orientation in space may change, its actual flight path may lag
behind where the aircraft is pointing, and it can take a while for the plane
to "catch up" to its new heading. The higher the velocity, and the
greater the mass, the more evident this is. Unless you have chosen to use the
Easy flight model, remember that an aircraft isn't like a train on rails that
will instantaneously go exactly where it's pointed. You have to take into
account its inertia. This is especially important if you are planning on
making wild maneuvers with a full bomb load or at high speeds!
Angle of Attack
On the pitch axis, the difference between where the nose is pointed and
where the plane is actually traveling (its velocity vector) is called the
Angle of Attack (AoA). Often times even when the nose appears level with the
horizon the aircraft may still be ascending or descending according to how
much lift is being generated by the wings.
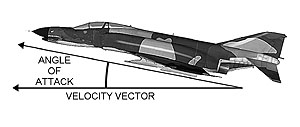
By increasing the angle of attack, both more lift (up to a point!) and
more drag are generated. Unfortunately, this added drag will have a
degenerative effect on speed, and this in turn decreases lift. The
deceleration can be counteracted by applying more throttle if there is more
power available and, when used on the vertical plane, thrust combined with
lift can overcome the force of gravity. As you can imagine, it's all a
delicate balancing act!
Slip Angle
On the yaw axis, the difference between where the nose is pointing and
where the plane is actually traveling is known as the slip angle. Having a
high slip angle greatly increases drag, as airflow slams into the side of the
aircraft rather than parting around it. In combat it can sometimes be useful
to momentarily have a high slip angle to bring the nose to bear on a target.
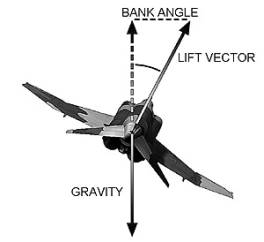
Lift Vector
Lift is generated by wings at an angle roughly perpendicular to where they
attach to the aircraft, originating from its center of mass. The direction in
which lift occurs is called the lift vector. In level flight this is straight
up, away from the ground, and directly opposite to the force of gravity. By
rotating on the roll axis, the lift vector no longer remains in precise
opposition to gravity, and the balance between the two is disturbed. With
less lift opposing gravity, the plane naturally loses altitude. In flight
pilots often anticipate and counter this loss by pointing the nose slightly
above the horizon when banking. The degree to which the lift vector varies
from the direct opposite of the force of gravity is called the bank angle.
Stalls
Stalls occur when there is not enough airflow over the wings to generate
lift. The higher an aircraft's speed, the more lift it creates; conversely,
the slower it travels, the less it generates. Eventually, it can slow down
enough that lift no longer counteracts the force of gravity, and the plane
will simply drop. This is known as a low speed stall and the velocity at
which it happens will vary between designs of aircraft. The only way to
recover from such a situation is to increase speed so that lift can once
again be generated by the wings. A low speed stall close to the ground can be
especially deadly, since there may not be enough time or altitude to recover.
Stalls can also occur at high speeds. Generally speaking, the greater a
wing's angle of attack, the more lift it generates. There comes a point,
however, where the angle of the wing is sufficiently steep that airflow over
it becomes disrupted and so turbulent so that the wing can longer create
lift, despite a high velocity. This is known as a high speed or an
accelerated stall. Easing off back pressure on the stick, thereby decreasing
the angle of attack of the wing, will allow proper airflow to once again
resume and lift will be restored. High speed stalls most often happen during
violent maneuvers.
Sweptback Wings
Many of the fighter planes modeled in Wings Over Europe have a high
sweepback to the wings. Sweepback was first utilized by the Germans during
WWII with their revolutionary Me-262 jet fighter, and it was subsequently
discovered to be vital for aircraft that would be traveling at high subsonic
and supersonic speeds. Highly swept wings require a higher angle of attack to
produce the same lift as straight wings, but this is a fair trade-off for the
higher speeds they allow. They also don't share the same stall characteristics.
As they reach higher and higher angles of attack, the rate at which lift
increases actually declines; finally, lift itself actually decreases without
the sharp break that happens with traditional wings. Furthermore, at
particularly high angles of attack, the rolling effect produced by ailerons
is significantly reduced and can actually create adverse yaw effects that can
only barely be countered by the rudder. Therefore, in this particular
situation, using the rudder and sideslipping creates more roll and proves
more effective than using the ailerons, known as "dihedral effect."
Fighter Sweep
Fighter sweeps are the most basic type of sortie for combat aircraft. They
are an offensive mission by fighters to seek out and destroy enemy aircraft
or targets of opportunity in a specified area. There are normally no assigned
goals, except to exert influence over a region and to maintain air
superiority.
Combat Air Patrol
(CAP)
Combat Air Patrols involve flying within a dedicated area and remaining on
the lookout for incoming enemy air threats. Aircraft are not allowed to stray
too far from their assigned waypoints, and often have to loiter for long
periods of time. Any hostile aircraft that enter the CAP area are to be
destroyed before they can reach their targets.
Intercept
Intercepts are defensive missions with the goal of engaging specific
aerial threats that have been identified by friendly forces. Planes are
vectored to close in on hostile aircraft, often heavily laden with bombs or
Air-to- Ground ordnance, and are to prevent them from reaching their targets.
Escort
Escorts are fighters that have been tasked to stay close to and defend
friendly aircraft from hostile air attacks. Escorted aircraft are often
strike fighters or bombers, and escorts usually fly in close formation with
them. The goal of an escort mission is not to destroy enemies, but to protect
the assigned aircraft. Convincing enemy fighters to break off an attack is a
key ingredient of a successful escort mission.
Strike
Strike missions involve attacking enemy surface targets either in close
support of ground forces or to knock out defenses and other targets deep
behind enemy lines. Specific Air-to-Ground ordnance suitable for the target
is almost always required and is only to be jettisoned when directly
attacked, likely preventing any possibility of mission success.
Close Air Support
(CAS)
Close Air Support means to engage enemy ground units close to, and in
support of, friendly ground forces from the air. CAS missions are often directed
by Forward Air Controllers (FAC) and are closely integrated with friendly
ground unit's own movement and fire. CAS can be both defensive or offensive,
and great care is required as friendlies will be operating near targets.
Suppression of
Enemy Air Defense (SEAD)
The targets of air defense suppression missions are enemy ground positions
that pose a threat to friendly aircraft in a specific area. Threats may be
Surface-to-Air missiles sites (SAMs) or AAA units. Knocking out these
defenses is vital to allow friendly air forces to operate with impunity, and
SEAD aircraft are often the first to arrive over a target area and the last
to leave. They are usually the most demanding missions.
Armed
Reconnaissance
Sometimes referred to as Search and Destroy missions, the primary goal of
Armed Reconnaissance is to find and attack targets of opportunity. Mission
orders are not specific and any hostile forces within the assigned area
should be considered legitimate targets, including all types of mobile
equipment.
Anti-Ship
Much like Strike missions, Anti-Ship missions involve attacking and
destroying ground targets - in this case, hostile watercraft. Enemy defenses
on anti-ship missions can vary tremendously, depending on the nature of the
target.
Reconnaissance
Reconnaissance missions are usually non-combative to discover and report
on enemy positions. This information used for subsequent attacks or to
prepare defenses.
All of the flyable aircraft modeled in Wings Over Europe share many
of the same cockpit instruments. While they may differ slightly in
appearance, they function in much the same way, as explained below. The
following list is of the basic instruments needed to play the game, and most
aircraft will actually have more than presented here.
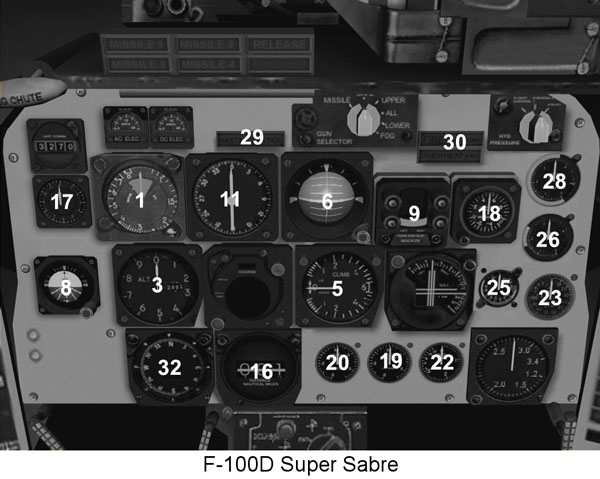
1. Airspeed and Mach Number Indicator
A combination airspeed and Mach number indicator. On the F-100 and A-4, the
needle displays the Indicated Air Speed (IAS) in knots on the outside wheel,
and an inner dial shows Mach number. The F-4's airspeed indicator is divided
into two parts: the right hand side of the gauge measures airspeed up to
roughly 200 knots, and the numerals on the left hand indicate a percentage of
Mach by tenths. The speed of sound varies according to air density and
therefore altitude.
2. True Airspeed Indicator
A measure of the aircraft's true airspeed (TAS) rather than its indicated
airspeed (IAS). TAS is velocity through space, while IAS is a measure of
airflow, variable by air density and wind conditions.
3. Altimeter
The altimeter measures altitude above sea level via barometric pressure.
4. Radar Altimeter
This gauge indicates feet about ground level as measured by a radar return.
5. Vertical Velocity Indicator (VVI)
Also known as a Vertical Speed Indicator (VSI), the VVI measures a gain or
loss of altitude by hundreds of feet per minute. Numbers on the top of the
gauge indicate a climb, numbers on the bottom a descent.
6. Attitude Indicator
Sometimes called a Horizon Ball, this gauge shows the aircraft's orientation
relative to the horizon with the sky shown as light blue. Horizontal white
lines show pitch in degrees of ten, and fixed hash marks to the outside are
used to measure bank angle.
7. Attitude Director Indicator
This instrument works similarly to the Attitude Indicator, but has more
detailed information, including a heading reference scale, bank indicator and
a turn and slip indicator.
8. Standby Attitude Indicator
A secondary Attitude Indicator in case the first fails.
9. Turn-and-Slip Indicator
This instrument measures bank angle and sliding on the yaw axis.
10. Angle-of-Attack Indicator
A measure of the pitch of the aircraft as divergent from its actual flight
path. In other words, it compares the difference between the flight path and
the actual pitch.
11. Heading Indicator
A rotating compass card viewed top down.
12. Standby Compass
A secondary compass in case others fail.
13. Radio Magnetic Indicator
Navigational equipment available on the A-4 and F-100, this instrument
contains a fixed compass card with two rotating pointers. The wide pointer
indicates the ground track (heading) of the aircraft, and the narrow pointer
indicates bearing to the next waypoint.
14. Position and Homing Indicator (PHI)
The PHI is a basic navigation tool. Consisting primarily of a rotating
compass card, it also has a pointer marking the correct bearing to the next
waypoint and digital numerals to show the range to it in nautical miles.
15. Horizontal Situation Indicator (HIS)
Found in the F-4 Phantom II, the HIS is a more sophisticated navigation tool.
The large pointer just outside of the rotating compass card shows the correct
bearing to the next waypoint from the current position. The long arrow
bisecting the entire gauge shows the course from the previous waypoint to the
next waypoint. The digital numerals on the left, bottom side of the gauge
measure range to the next waypoint in nautical miles. Lastly, the innermost
component measures current course deviation from the line between the
previous to next waypoint.
16. Range Indicator
A basic gauge showing range to the next waypoint in nautical miles.
17. Clock
A timepiece set to local time.
18. Accelerometer
This measures the amount of G forces acting on the aircraft.
19. Internal Fuel Quantity Indicator
A measure of available fuel in all internal tanks.
20. External Fuel Indicator
A measure of available fuel in external tank(s).
21. Total Fuel Quantity Indicator
A measure of total fuel remaining.
22. Fuel Flow Indicator
A measure of the amount of fuel flow at the current throttle setting (and
therefore, consumption).
23. Tachometer
An indicator of engine revolutions per minute, measured as a percentage of
total allowable RPM.
24. Engine Nozzle Position Indicator
A gauge to indicate the current aperture of the jet nozzle.
25. Exhaust Gas Temperature Gauge
A measure of the heat of the exhaust from the jet engine. Excessively high
heat can indicate an engine malfunction or engine overuse at high settings.
26. Oil Pressure Gauge
An indicator of oil pressure in the engine. An overly low reading signifies a
malfunction.
27. Oil Quantity Indictor
A measure of the amount of oil present in the oil receptacle. A low reading
could signify a leak, or an overly hot engine. An engine that runs with too
little oil will sustain damage and may stop functioning altogether.
28. Hydraulic Pressure Gauge
A measure of the pressure of hydraulic fluids that are used to move control
surfaces. A low reading could mean reduced or total loss of control of any or
all of the ailerons, elevator and rudder.
29. Caution Light
A master warning light signifying a general malfunction. Check all gauges and
systems if lit.
30. Fire Warning Light
An indicator of a fire in the engine.
31. Armament Control Panel
A weapons panel to indicate status of weapons and related systems.
32. Radar Warning Receiver (RWR)
The RWR can detect, identify and characterize radar signals 360 degrees
around the plane, displaying threat type and the relative bearing. It can
also identify if the threatening radar is in search mode or is tracking the
aircraft.
33. Radar Scope
Displays the radar image.
Possibly the most complicated instrument in the cockpit, the radar can be
placed in standby mode to avoid detection by hostile forces and leaving it on
for prolonged periods may increase the chance of malfunction. There are four
selectable modes of operation: Search, Boresight, Ground Map and Terrain
Avoidance. Acquisition and Track modes are modes operated automatically by
the radar system.
Not all aircraft in game have radar on board, and not all radar have the same
capabilities. The F-4 radar has a maximum search range of 200 miles and a
track range of 50 miles; The A-4 radar has Ground Map and Terrain Avoidance
modes only, for example.
Search Mode
In Search mode the radar antenna sweeps the sky in front of the aircraft,
displayed as a vertical line tracing across the scope. The range can be set
to 10, 25, 50, 100 or 200 miles in the F-4. Longer range settings also scan a
greater arc vertically. Targets are displayed as a momentary blip on the
B-sweep, and a bracketed acquisition bar can be manually cycled through all
targets on the scope when the display range selected is within the radar's
track range. The radar system can then be ordered to attempt to lock on and
track the target with the acquisition symbol, at which point the system will
automatically transition to Acquisition mode.
Boresight Mode
Rather than sweeping, in Boresight mode the radar antenna is fixed on a
reference line directly ahead of the aircraft. Any target within +/- 3
degrees of the CAGE gunsight circle is detected, and the radar will
automatically go into Acquisition mode to attempt to lock on and track it.
Acquisition Mode
Acquisition Mode is an automatic transition layer between Search or
Boresight modes and Track mode. A Range Gate Strobe will move from the bottom
of the display toward the selected target symbol as the system attempts to
lock on and track the target. If successful, the radar will then
automatically transition to Track mode.
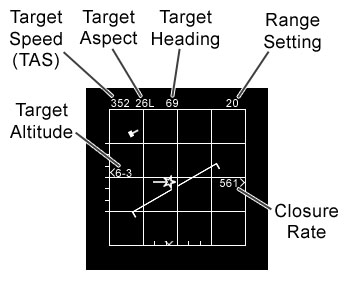
Track Mode
Once a target is being successfully tracked, Track mode will display angle
and range tracking information and the system will automatically keep the
antenna pointed towards the target. As long as the lock is maintained, a
radar-guided missile can be fired at the target. A large Range Rate Circle
will appear in the display with a small break in its perimeter, known as the
Vc Gap . The orientation of this gap indicates the rate of closure to the
target. When the gap is in the 12 o'clock position, this signals the distance
to the target is constant. A clockwise rotation of the gap designates
decreasing range, and a counterclockwise rotation an increase. The actual
position of the Vc Gap indicates the following:
|
Position
of Gap
|
Rate
of Closure
|
Position
of Gap
|
Rate
of Closure
|
|
10:30
(315-deg)
|
450kts,
opening
|
4:00
(120-deg)
|
1200kts,
closing
|
|
11:00
(330-deg)
|
300kts,
opening
|
5:00
(150-deg)
|
1500kts,
closing
|
|
12:00
(360-deg)
|
0kts
|
6:00
(180-deg)
|
1800kts,
closing
|
|
1:00
(30-deg)
|
300kts,
closing
|
7:00
(210-deg)
|
2100kts,
closing
|
|
2:00
(60-deg)
|
600kts,
closing
|
8:00
(240-deg)
|
2400kts,
closing
|
|
3:00
(90-deg)
|
900kts,
closing
|
9:00
(270-deg)
|
2700kts,
closing
|
Ground Map Mode
In Ground Map mode, the radar will scan the terrain ahead with a PPI
sweep, tracing an arc across the face of the scope. Significant terrain
contours and any ground targets will be displayed.
Terrain Avoidance
Mode
The simplest radar mode, Terrain Avoidance displays any obstacles that lie
ahead parallel to the aircraft's current flight path with a clearance plane
elevation fixed at 500 feet below. If an object appears in the scope,
climbing until it disappears will avoid it.
F-15A Eagle carries APG-63 radar, the most advanced radar of its time. The
radar was the first US airborne radar to incorporate Programmable Signal
Processor, and its capabilities are significantly enhanced over earlier
generation radars, such as the one carried by F-4 Phantom.
There are three selectable modes available: Search, Track-While-Scan
(TWS), andAir Combat (ACM) modes. Single Target Track (STT) mode is entered
by the radar system when target track is established.
Search Mode
Search mode has the widest search volume and fastest search time, but only
shows minimum information regarding targets. The display shows top-down view
displaying radar contacts' azimuth and range relative to the radar. Target
can be designated using Cycle Radar Target keys, and Acquire Radar Target key
can be used to transition to STT mode.
Track-While-Scan
(TWS) Mode
TWS mode displays additional information about the currently designated
target while still showing basic azimuth/range info on other targets. Radar
in TWS mode scans slightly smaller volume than in Search mode, and radar
elevation is automatically centered on the currently highlighted target. The
display shows top-down view displaying radar contacts' azimuth and range
relative to the radar, and target symbol may have a vector to show its
movement direction. Different targets can be designated using Cycle Radar
Target keys, and Acquire Radar Target key switches to STT mode.
Additional info may be displayed depending on the current air-to-air
weapon type selected.
Radar targets symbols while in TWS mode:
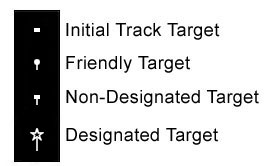
If Avionics Option is set to Hard, it takes the radar 3 hits before it can
gather enough information needed to show target vector and friendly info on
non-designated target.
Single Target
Track (STT) Mode
STT mode displays the all the same information as the TWS about a single
target, but does not display any other targets. Radar can be used to guide
radar-guided missiles (AIM-7 Sparrow) from this mode. Shows top-down view
displaying radar contacts' azimuth and range relative to the radar, and
target symbol has a vector to show its direction. Additional info may be
displayed depending on the current air-to-air weapon type selected.
Auto Acquisition Mode
Radar in Auto Acquisition mode only displays basic radar operation info,
and does not display any target info. The radar scans straight ahead and
vertically from 0 to 55 deg above the boresight line. It automatically locks
on to the first target it encounters in its search arc, and switches to STT
mode.
Wings Over Europe is a flight simulation, and by nature includes
Air-to-Air and Air-to-Ground combat. This section covers the basic knowledge
guiding air combat, a necessity for any successful pilot.
Rules of Thumb
There are a few basic rules of thumb that all fighter pilots live by in
combat, especially when in gun range. Learn them well, as they may just save
your virtual life! The first is "Lose sight, lose the fight." In
simple terms, this means always keep your eye on enemy aircraft and
constantly analyze their position and orientation relative to yours. The
moment you lose sight of a bandit you can no longer tell how it is
maneuvering or if it is threatening your aircraft. Make it your first
priority to re-establish sight of it!
A second basic maxim of ACM (Air Combat Maneuvering) is "Speed is life!"
This rule holds true for a couple of reasons, but an important one is that
speed can easily be cashed in for altitude. Similarly, a high flying aircraft
can dive to pick up speed and for this reason "Altitude is life!"
is also a popular saying. This trade-off between altitude and speed is known
as "energy." A fighter at a high speed and high altitude is almost
untouchable (it has very high energy and therefore lots of options), a low
flying fast aircraft or a lower speed fighter with altitude both have medium
energy (each have a few different options) whereas a low flying, low speed
aircraft that has used up all its "E" has next to no options.
Needless to say, energy management and keeping your options open is critical
in a dogfight.
A third basic tip is not to fly straight and level in combat. Keeping a
constant course makes you easy prey and is very predictable. Also, learn to
think in three dimensions: not only do aircraft move about on a horizontal
plane, but they can also use the vertical one very effectively. By using
vertical maneuvers, a pilot can easily turn the tables on an opponent that
insists on making only flat turns.
Using the Lift
Vector
As explained in the Flight Basics section, the lift vector is the
direction in which lift is applied on an airframe. Lift as a force is not
only used to counter gravity, but it can also be used in maneuvers. Since
lift is effectively "pushing" your aircraft in a known and constant
direction, you can use that force to your advantage. Rolling an aircraft so
that your lift vector points towards your target will force you to accelerate
towards it; subsequently increasing pitch by pulling back on the stick will
then increase your turn rate toward it (subject to certain limits, see
below). When following an enemy aircraft, keeping your lift vector on the
same plane of motion as that of your foe can help you turn inside of it and
set up a kill.
G Forces
G force is the measurement of inertial loads, with 1G being the normal
force of gravity. The higher an aircraft's velocity, the easier it is to
increase G loading during maneuvers. G forces act on both pilots and
aircraft, sometimes with negative consequences. Sustained high positive Gs
send blood rushing out of a pilot's head, and can lead to increasingly grayed
vision and eventually unconsciousness, known as "black out." Human
beings are much less tolerant to negative Gs, which force blood into the head
and can lead to a condition known as "red out" as vessels in the
eye become engorged and vision is negatively affected. In order to recover
from either black out or red out, G loads must be reduced to allow more
normal blood flow to the brain and eyes. Aircraft can also be damaged if Gs
are allowed to climb too high, even if only for a moment. As airspeed
decreases the ability to initiate and hold G forces is reduced.
Turn Rate versus
Turn Radius
Turn Radius is the size of a circle flown by an aircraft as measured from
the center and decreases as velocity is reduced. While this is an important
figure, the fighter that can turn the tightest isn't always at an advantage
in a dogfight. Turn Rate - the speed with which the nose changes heading,
measured in degrees per second - is even more significant. Since firing air
to air weapons is generally done from the forward aspect of a fighter, the
rate at which the nose can be brought to bear onto a target is critical.
Thus, even though an aircraft may be creating a wider circle than its
opponent, if it can travel around that circle more quickly, it is at an
advantage. At any given velocity and G load, an aircraft has a specific turn
radius and turn rate.
Corner Velocity
At high speeds turn rate is limited by the amount of G forces that can be
sustained. As speed lowers and maximum Gs are maintained, turn rate
increases. This seems ideal but, as mentioned above, as airspeed is reduced,
so is the ability to hold Gs. The slowest speed at which maximum Gs can be
applied is known as Corner Velocity and is the point at which an aircraft has
the maximum instantaneous turn rate. Corner Velocity will vary between
aircraft and is important to learn, as this is where a fighter will perform
at its best. Unfortunately, most aircraft don't have enough thrust to
maintain this velocity under maximum G loads and will find that their turn rate
decays as their speed and hence Gs decrease. The maximum constant velocity
that can be held with the highest steady G load is known as Sustained Corner
Velocity and results in a steady rate of turn. One of the reasons energy
management is critical is so that pilots can temporarily achieve corner
velocities above the sustained rate and as close as possible to the
instantaneous turn rate.
Immelman Turn
Named after Max Immelman, a German pilot during the dawn of aerial combat,
WWI, this move involves pulling back on the stick and climbing through the
vertical as part of a half loop. At the top of the loop, when the aircraft is
inverted, the pilot rolls through 180 degrees to be right side up and facing
the opposite direction from where the maneuver was started. The aircraft
finishes at a higher altitude than it began, with a resultant loss in
velocity. Useful for changing direction quickly, it can be dangerous when
pursued closely since an opponent can easily achieve a firing solution when the
plane is slow towards the top of the loop. Insufficient speed before entering
an Immelman will result in a stall.
Spit-S
The Split-S can be considered the counterpart to the Immelman, since it is
also a half loop. However, in this case the pilot rolls inverted before
pulling back on the stick and then performs the half loop while descending.
The end result is a 180 degree change in direction, a loss of altitude and a
gain in airspeed. It is critical that it be performed with sufficient height
to avoid flying into the ground. Mainly a defensive move, it can also be used
if an opponent flies beneath you in the opposite direction. The half roll is
executed before the loop since a pilot can withstand many more positive Gs
than negative ones.
Break Turn
A break turn is used to quickly defeat a guns solution by a hostile
aircraft that is rapidly closing from the rear aspect. It is executed by
banking either right or left and pulling back on the stick rapidly so as to
carve a tight turn and force an overshoot. It is imperative to turn into the
attacker and not away from him, as the latter would give him an even easier
shot. A break turn is best performed level with the horizon or lower to avoid
a pop-up in altitude and loss of speed, thus unwittingly becoming an even
easier target. Break turns are most effective when the pursuer has a
significant speed advantage and therefore cannot pull as tight a turn.
High and Low
Yo-Yo
A Yo-Yo, whether high or low, is a very effective offensive tactic against
an opponent that insists on making flat turns. Its principle advantage is
that by using the vertical plane an aggressor can create an offset path of
pursuit and thus gain an angle on the enemy. The Yo-Yo is performed by
rolling outside of the horizontal plane during a turn and pitching up or
down, followed by an opposite roll back into the original turn. The end
result is that you will have effectively "cut the corner" of the
flat circle and will find yourself more squarely on your opponent's rear. The
High Yo-Yo should be used when you have energy to spare and are above Corner
Velocity, while the Low Yo-Yo should be used when you need to gain speed to
reach your instantaneous turn rate.
The F-100 Super Sabre and F-4 Phantom II are equipped with a Lead Computing
Optical Sight System (LCOSS). This gunsight can be operated in three modes:
CAGE, A/A and A/G.
In CAGE mode the gunsight reticle is fixed along the radar boresight line
of the aircraft. When selecting Air-to-Air missiles the LCOSS automatically
goes into CAGE mode.
In A/A (Air-to-Air) mode and with the cannon selected, the gunsight is
placed in lead computing mode with the reticle position governed by the sight
gyro and radar range. By these means the sight effectively predicts where
cannon fire will go, given your current G load and range to a selected
target. Place the predictor sight onto the target and fire guns to hit it. If
no air target is selected, the sight defaults to a range of 1,000 feet.
In A/G (Air-to-Ground) mode, the sight is manually depressible to 245 mil
below the fuselage line.
In F-4 Phantom II, the LCOSS also has roll tabs and a range bar. The range
bar moves from roughly the 1 o'clock position (delineating maximum range) to
the 6 o'clock (showing minimum range) and reflects different distances
according to the weapon selected.
Aerial combat during the Korean War and even into the early 1960s was
still very much a visual affair. While bogeys could be plotted on airborne
radar at quite a distance, fire control technologies that existed were quite
primitive by today's standards and downright unreliable. Heat-seeking
missiles had to be fired within very specific parameters, and cannon still
proved very effective for in-close fighting. This lesson is evident by the
case of the F-4 Phantom II, which began life without any onboard cannon and
was overly reliant on missiles; it later had gun pods fitted, and finally had
a 20mm Vulcan cannon installed in the nose by 1967.
On board fire control radars of the 1960s could only lock onto one enemy
at a time, and radar-homing missiles had to "ride the beam" to
their targets, not having their own independent guidance systems.
Missile technology evolved quickly, though, and Air-to-Air capabilities
steadily increased throughout the decade.
Heat-Seeking
Missiles
Many aircraft can only be equipped with heat-seeking missiles and don't
have the capability to fire radar-guided ones. Infrared (IR) missiles track
the heat signature produced by a jet's exhaust. To be used successfully, they
have to be fired from the rear aspect of the target; otherwise, they will not
pick up a heat source properly. Early versions were sometimes fooled by other
objects that radiate heat against the sky like the sun or clouds. Even the
most modern heat-seeking missiles can still be fooled by flares.
When AIM-9 missiles are selected, you will hear a constant medium pitched
tone known as a "growl." As the IR seeker head detects and locks
onto a source, this pitch will change to a high tone. The sensor of a heat-seeking
missile has a limited field of view, so in order to "get a tone,"
the target has to be roughly within your gunsight (it will have automatically
switched to CAGE mode) and within range of the seeker head.
Early Sidewinder missiles could not be fired when pulling too many Gs.
Likewise, a missile also has maneuverability limits, and if it is fired from
too close a range or too high an aspect angle, it may not be able to turn
sharply enough to engage the target. The best way to ensure your missile hits
is to have a constant tone and to be following the target in pure pursuit
without a high G load. The maneuverability and/or maximum range of Sidewinder
missiles improves with each variant.
If your target is too close to use AIM-9 missiles, use your guns!
Radar-Guided
Missiles
Radar-homing missiles (RHM) rely on information from a radar signature to
find their way to a target. They operate at a much greater range than
heat-seeking missiles and can be fired from any aspect, meaning you do not
have to maneuver to the rear of a bandit. While in flight, they require radar
information constantly provided by the aircraft from which they were
launched. Unlike a heat-seeking missile which is "fire and forget",
their guidance depends on a radar lock being kept by your radar and the
target being illuminated. At longer ranges this can be defeated by enemy
radar jamming, and only one target can be illuminated at a time. Hostile
aircraft can also employ chaff defensively to defeat radar locks.
For information on how to achieve a radar lock using your radar scope,
view the Using the Radar section of this
manual.
There are three types of air-to-ground guided missiles available in Wings
Over Europe: 1) Anti-radiation missile (ARM), such as AGM-45 Shrike and
AGM-78 Standard ARM, 2) Electro-Optical (EO) weapons, including AGM-65
Maverick, GBU-8 HOBOS, and Walleye, and 3) Laser-guided bombs (LGB), such as
GBU-10/12 Paveway I series bombs.
Anti-Radiation
Missile (ARM)
Anti-radiation seeker head homes in on the emitted signal from enemy
ground radar installation and is completely self-guided. To use these
missiles, simply point the aircraft toward a known enemy radar, and fire. If
the enemy radar is within the range, it'll automatically lock on and guide
itself to the target.
Electro-Optical
(EO) Guided Weapon
EO weapons are guided using small TV camera located on the nose of the
weapon. Once EO-guided weapon is selected, the radarscope will display the
image seen by the EO seeker of the selected weapon. To use EO-guided weapon,
simply select the visual target (by hitting Select Ground Target key), and if
the target is in seeker range and in seeker field-of-view, the weapon will
automatically lock-on to the selected target. The radar display will show the
weapon seeker tracking the target, and the Heads-Up-Display will display a
symbol indicating where the target is located. Once fired, EO-guided weapons
are "fire-and-forget", and the attacking aircraft may immediately
switch target for next weapon without losing guidance.
Laser-Guided Bomb
(LGB), No Designator (A-10)
Laser-Guided weapons are guided toward reflection of laser dot
"painted" on the target by a laser designator. If the aircraft is
not carrying the laser designator (A-10), then it cannot select target on its
own - it can only attack primary targets, which are always being designated
by other laser designators (such as Special Forces on the ground). The
Heads-Up-Display will display a symbol indicating where the laser is
designating. Since the target is being lased by other units, the attacking
aircraft does not have to maintain target, and can immediately switch to
another target to attack using other weapons.
Laser-Guided Bomb
(LGB), with Designator (AVQ-23 Laser Designator Pod on F-4)
If the aircraft is carrying a laser designator (such as AVQ-23 Laser
Designator Pod on F-4), the radarscope will display image similar to
EO-guided weapon, and the target may be selected similarly using the Select
Ground Target key. If the target is in designator range and in designator
field-of-view, the display will show the designator tracking the target, and
the Heads-Up-Display will display a symbol indicating where the laser is
currently designating. Laser-guided weapons fired this way are not
"fire-and-forget", and the target must remain designated until the
weapon impact. Switching visual target while bomb is still in flight will
cause the bomb to lose its target and miss.
US Air Force:
- A-10A Thunderbolt II
- F-4C Phantom II
- F-4D Phantom II
- F-4E Phantom II
- F-100D Super Sabre
- F-105D Thunderchief
- F-15A Eagle
NATO Air
Forces:
- F-4F Phantom II (GAF)
- Hunter FGA. Mk.9 (RAF)
- Harrier GR. Mk.1 (RAF)
- Harrier GR. Mk.3 (RAF)
- Phantom FGR. Mk.2
(RAF)
AI Planes,
Enemy
- MiG-17
"Fresco-A"
- MiG-17F
"Fresco-C"
- MiG-19S
"Farmer-C"
- MiG-21F-13
"Fishbed-C"
- MiG-21PF
"Fishbed-D"
- MiG-21PFM
"Fishbed-F"
- MiG-21MF
"Fishbed-J"
- MiG-23M
"Flogger-B"
- MiG-27
"Flogger-D"
- Su-7BM
"Fitter-A"
- Il-28
"Beagle"
- Tu-16
"Badger"
- Tu-22
"Blinder"
- An-12 "Cub"
AI Planes,
Friendly
- B-52D Stratofortress
- B-57B Canberra
- O-1 Bird Dog
Cannon
20mm Mk. 12
The Mk. 12 is the standard cannon armament used by the US Navy. It has a
muzzle velocity of 1,010 meters per second (m/sec) and a rate of fire of
1,200 rounds per minute (rpm). It has a reputation for being inaccurate and
unreliable, yet is used on almost all US Navy fighter and attack aircraft,
including the A-4 Skyhawk.
20mm M39
The M39 is a twin-revolver type cannon developed for the US Air Force. It has
a muzzle velocity of 1,030 m/sec and a rate of fire of 1,700 rpm. It is found
on the F-100 Super Sabre.
20mm M61
Vulcan The M61 is a six-barreled, externally-powered, rotary cannon firing at
rate of 6,000 rpm. It is the current standard cannon armament for the US Air
Force, and is mounted internally on the F-4E version of the Phantom II. The
M61 Vulcan cannon is also available as an external gun pod, in the form of
SUU-23/A gun pod.
30mm ADEN
30mm ADEN (Armament Development Establishment) is the standard cannon used on
British aircraft. It was designed in the late 1940s as a replacement for the
older Hispano 20mm Cannon used in WWII. The 30mm ADEN first entered service
with the Hunter, and used on almost every British fighters developed since.
Heat-Seeking
Missiles
AIM-9B Sidewinder
The Infra-red (IR) homing AIM-9 missile is one of the most widely used
Air-to-Air missiles in the world, with over 110,000 produced. It is simple,
easy to use, and reliable; it is employed by a wide variety of Western fixed
wing combat aircraft and helicopters. The performance of AIM-9B, the first
production version of the Sidewinder entering service in 1956, however is in
many unsatisfactory. Its launch load factor is limited to 2G, and its seeker
head can be easily be fooled and locks onto false heat signatures. It has a
range limit of 2.6 miles, and the missile is unable to follow MiGs turning at
more than 5 G's. To score hits, the launching aircraft has to be properly
positioned with great attention paid to closure rate and range.
AIM-9D Sidewinder
The AIM-9D, entering service in 1966, is a much superior version of the
Sidewinder developed and used by the US Navy. It has a new seeker head and
new motor for vastly improved range and performance. This US Navy AIM-9D is
incompatible with US Air Force's AIM-9 launching rails.
AIM-9E Sidewinder
The AIM-9E is a slightly improved version of the Sidewinder used by the US
Air Force. Its improvements over the original AIM-9B are limited - it has a
new seeker head, but leaves warhead, fuse and motor untouched. AIM-9E's
performance is well below that of AIM-9D, despite the fact that AIM-9E
entered service over a year later in 1967.
AIM-9E-2 Sidewinder
The AIM-9E-2 is a version of AIM-9E with a smoke reducing motor, making it
less visible at launch. Otherwise, it has the same performance as the AIM-9E.
AIM-9F Sidewinder
The AIM-9F is a version of Sidewinder manufactured in West Germany for use by
NATO forces. It is based on AIM-9B body, but with the improved seeker
head used on the AIM-9E. It entered service in 1969, and is used by the
West German F-4F Phantom II.
AIM-9G Sidewinder
The AIM-9G is a development of the AIM-9D Sidewinder used by the US Navy.
First introduced in 1968, it has a more sensitive seeker head and much
greater maneuvering capability, making it much more effective in aerial
combat. Like the AIM-9D, this version of the Sidewinder is not available on
US Air Force aircraft.
AIM-9H Sidewinder
The AIM-9H, entering service in 1970, is the next development of the US Navy's
Sidewinder series, with improved reliability. As with the other US Navy
Sidewinders, this version can not be used by US Air Force aircraft.
AIM-9J Sidewinder
The US Air Force continued to develop its own Sidewinder series
independently, and AIM-9J, introduced in 1972, is their next version with
improved reliability over the E model. Its performance is still below
that of the Navy's AIM-9H Sidewinder.
AIM-9L Sidewinder
The AIM-9L, introduced in 1978 after being developed jointly by the US Air
Force and the Navy, represents a major advance in the Sidewinder development
- it is the first "all-aspect" Sidewinder missile, with ability to
attack target from all angles, even from head-on. The pilots no longer have
to maneuver behind the target for a missile shot, resulting in dramatic
improvement in the effectiveness over the earlier models.
Radar-Guided
Missiles
AIM-7D Sparrow
The AIM-7 Sparrow III missile, first introduced in 1959, is a medium range
air-to-air missiles with semi-active radar guidance. They are capable of
attacking targets from all aspects, with maximum range of up to 20 miles but
varying greatly according to target aspect and closing speeds. The launching
aircraft must maintain radar lock and illuminate the target throughout the
missile's entire flight for it to guide properly.
AIM-7E Sparrow
The AIM-7E, entering service in 1965, is the improved version of the Sparrow.
It uses a new propulsion system, giving it better range and performance.
AIM-7E-2 Sparrow
The AIM-7E-2 Sparrow, so called "Dogfight Sparrow", is an AIM-7E
missile modified for use in the short minimum-range and high-G firing
required in dogfights. The Dogfight Sparrow entered service in 1970.
AIM-7F Sparrow
Improved version of Sparrow introduced in 1976, the AIM-7F has dual-stage
rocket motor for longer range, solid-state electronics for improved
reliability, and a larger warhead for increased lethality.
Skyflash
Skyflash is a British semi-active radar guided missile derived from the US
AIM-7 Sparrow missile. It features improved seeker and electronics, making it
less susceptible to enemy electronics countermeasures. The missile entered
service in 1978, and is used on British Phantom FGR.Mk 2.
Anti-Radiation
Missiles (ARM)
AGM-45A Shrike
Entering service with the US Navy in 1965 and then with the US Air Force, the
AGM-45A Shrike is a weapon used to destroy enemy Surface-to-Air Missile (SAM)
sites. Its anti-radiation seeker head homes in on the emitted signal from a
ground radar installation and is completely self-guided. When a SAM site
turns off its radar, the AGM-45A will lose its lock and does not have the
capability to continue to target. Its maximum range is roughly 10 miles.
AGM-45B Shrike
Improved version of the original AGM-45A Shrike, with a new propulsion system
giving it a much better range (about 28 miles). The AIM-45B began entering
service in 1970.
AGM-78B Standard ARM
Produced in 1968, the AGM-78B is a anti-radiation missile based on US Navy's
Standard Surface-to-Air Missile body. Its seeker head has a much greater
overall field of view, and it has the capability to track many different
frequencies of radar. It also has a basic memory circuit allowing it to
continue to target even after the radar source stops emitting. Its maximum
range is roughly 56 miles.
Electro-Optical
(EO) Guided Weapons
AGM-65A Maverick
The AGM-65A Maverick is an electro-optically guided air-to-ground missile
designed primarily for close-air-support. It provides stand-off
capability against a wide variety of tactical targets, including tanks, air
defenses, and other vehicles. The AGM-65A entered service in 1972, and its TV
guidance system has maximum lock-on range of about 6 miles.
AGM-65B Maverick
The AGM-65B is an improved Maverick, with a scene magnification capability
allowing it to lock-on to a target at greater range (about 12 miles).
GBU-8/B HOBOS
The GBU-8/B HOBOS (Homing Bomb System) is an electro-optically guided bomb
developed by the US Air Force. Entering service in 1969, it is essentially a
standard Mk.84 2,000-lb bomb casing fitted with a TV guidance and control
kit. The TV guidance has range of about 3 miles, but since the bomb is not
powered and relies on the gravity, the maximum release range varies depending
on the altitude.
Mk. 1 Mod 0 Walleye I
The Walleye series of bombs are Electro-optically guided bombs developed by
the US Navy. The Mk. 1 Mod 0 Walleye I entered service in 1967, and its TV
guidance has lock-on range of approximately 3 miles. The bomb has no
propulsion unit, and the maximum range varies depending on the release
altitude.
Mk. 5 Mod 4 Walleye II
The Mk. 5 Mod 4 Walleye II, entering service in 1974, is a larger warhead
version of the Walleye. It also features an improved TV guidance unit,
giving it an increased lock-on range of about 4.5 miles.
Laser-Guided
Bombs (LGB)
GBU-10/B Paveway I
The Paveway series of bombs are laser-guided bombs developed by the US Air
Force. The GBU-10/B Paveway I, entering service in 1968, is a standard
Mk.84 2,000-lb bomb casing fitted with a laser-guidance and control kit, and
it has lock-on range of about 4.5 miles. Like other guided bombs, Paveway
LGB's are not powered, and its maximum range varies depending on the release
altitude.
GBU-10C/B Paveway II
The GBU-10C/B Paveway II is an improved version entering service in
1975. It has an enhanced seeker head with higher reliability and
increased range of about 5 miles.
GBU-12/B Paveway I
The GBU-12/B Paveway I is a version of Paveway I based on a smaller Mk.82
500-lb bomb. Entering service in 1968, it has the same seeker head as
the GBU-10/B, and it has the same range of 4.5 miles.
GBU-12B/B Paveway II
The GBU-12B/B Paveway II has the improved seeker head of GBU-10C/B mated with
a smaller Mk.82 500-lb bomb. It entered service in 1975 and has range
of 5 miles.
Unguided Rockets
LAU-3/A Rocket Pod
The LAU-3/A Rocket Pod carries nineteen 2.75" unguided rockets with
explosive warheads. The pods are usually mounted in tandem on under-wing
pylons.
LAU-10/A Rocket Pod
The LAU-10/A Rocket Pod carries four 5" unguided rockets with explosive
warheads. The pods are also usually mounted in tandem.
Unguided Bombs
M-117 Bomb
The M-117 bomb is a conventional general purpose bomb weighting 750 lb.
Mk.80 Series
The Mk.80 Series of bombs (Mk.81, 82, 83, 84) are the standard low-drag,
general- purpose bombs.
Mk.82 Snakeye Retarded Bomb
The Mk.82 Snakeye is a 500-lb bomb that is equipped with special fins that
open up and extend behind the bomb like an umbrella, slowing it down
dramatically. Used in low-altitude level bombing, this allows the launching
aircraft time to be clear of the bomb's blast radius.
Mk.20 Rockeye Cluster Bomb
The Mk.20 Rockeye Cluster bomb is a free fall weapon that carries hundreds of
small bomblets that can be spread across a great area upon release.
Individual bomblet has shape charged warhead that are set to explode on
impact. The Rockeye is effective against both hard targets like armor and
soft skinned targets.
BLU-1 Napalm
The BLU-1 Napalm bomb is an aluminum canister filled with fuel gel. Tumbling
end over end when released, as it strikes a target or the ground the
container will rupture, spreading highly flammable napalm that sticks to most
structures. Upon impact, fuses rapidly ignite the fuel gel. Napalm is
effective against personnel, light structures and vehicles.
The game has a default set of key commands. You can alter them by opening
the Options Screen. Click the green aircraft
icon in the upper left corner of the screen, then select Control. The default
control list is loaded by default, but you can click Customize to change the
key mappings. If you choose to customize, a new *.INI file will be saved in
the Controls subdirectory under the main game folder.
|
Esc
|
End/abort
mission and display the Debrief Screen.
|
|
Alt+Q
|
Close
the game immediately and return to the desktop.
|
|
Alt+P
|
Pause
the game. (You can still perform many functions while the game is paused.)
|
|
Alt+T
|
Change
the rate at which time passes - x2 (twice as fast), x4 (four times as
fast), x8 (eight times as fast) and x1 (normal speed).
|
|
Alt+R
|
Reset
time compression back to x1.
|
|
Alt+N
|
Jump
to the next mission encounter. You can use this option only when no enemy
targets are present. When pressed, this key takes you to the next action
area and eliminates all travel time (including waypoints).
|
|
Tab
|
Display
the radio communication menu. You can then press the number keys (1 through
9 at the top of the keyboard) to select a specific menu or message. (See
In-Flight Communication for specific messages and their effects.)
|
|
`
(accent grave)
|
Initiate
chat mode in multiplayer play. Once in chat mode, all keyboard functions
cease to operate, and all keys are sent to the chat window. (Your joystick
and mouse, however, work normally.)
Esc Aborts message and exits chat mode.
Enter Sends the chat message to all team members and exits chat mode.
|
|
Shift+`
(accent grave)
|
Initiate
a chat with an enemy player.
|
|
Ctrl+`
(accent grave)
|
Initiate
a chat with a friendly player.
|
|
Alt+`
(accent grave)
|
Initiate
a chat with the closest visual target.
|
|
A
|
Toggle
autopilot on/off. In Autopilot mode, your aircraft flies toward the next
waypoint. Note that moving the joystick or mouse will cancel autopilot.
Autopilot also does not pause for enemy encounters.
|
|
Shift+A
|
Toggle
wing-leveling action. When activated, this feature restores level flight
and keeps the aircraft moving in a straight line. If you move the joystick
or mouse while this function is active, the game will drop out of
wing-leveling mode.
|
|
W
|
Select
next waypoint.
|
|
Shift+W
|
Select
previous waypoint.
|
|
Alt+M
|
Display
the in-flight map, a version of the Planning Map, but with less
information. It basically shows your current position and the position of
known mission-critical objects.
|
|
PrtScrn
|
Take
a screen shot. The current scene will be saved as a bitmap image in the
ScreenShots folder.
|
Note: In all interior views, you can move the mouse to pan the view up,
down, left and right.
|
F1
|
Display
the interior, front cockpit view.
|
|
F2
|
Display
the interior, front cockpit wide view.
|
|
F3
|
Display
the interior, front cockpit narrow (gunsight) view.
|
|
Shift+F1
|
Show
a front 45-degrees up view from inside the cockpit.
|
|
F4
|
Toggle
the padlock view, keeping the selected target in your view as long as it's
in range. This option attempts to keep your current foe centered in your
view. Pressing this key a second time switches the view back to front
cockpit view (F1).
|
|
Numpad
keys
|
Temporarily
pan the view in a given direction. The view returns to its previous
position when you release the key.
|
|
Numpad Del (.)
|
Toggle
cockpit art on/off, leaving only the HUD targeting circle.
|
|
Numpad 0
|
Display
a forward view of the dashboard, looking down at the instruments.
|
|
Numpad
8
|
Display
the forward view.
|
|
Numpad
7 / 4 / 1
|
Display
the left front / left / left rear view, respectively.
|
|
Numpad
9 / 6 / 3
|
Display
the right front / right / right rear view, respectively.
|
|
Numpad
5
|
Add
45 degrees of vertical angle to any other view. (Press this key in
conjunction with the other Numpad view keys.)
|
|
F5
|
Display
an external, over-the-shoulder ("chase plane") view.
|
|
Shift+F5
|
Show
an external rear view. Use this view to "Check Six" (look behind
you).
|
|
F6
|
Cycle
through external views of various aircraft in the mission. Pressing this
key multiple times in succession switches to the next aircraft.
|
|
Shift+F6
|
As
above, but in reverse order. Pressing this key multiple times switches to
the previous aircraft.
|
|
F7
|
Display
an external view of the next ground object. Pressing this key multiple
times switches to the next ground object.
|
|
Shift+F7
|
As
above, but in reverse order. Pressing this key multiple times switches to
the previous ground object.
|
|
F8
|
Display
an enlarged view of your current visual target.
|
|
Shift+F8
|
Show
a line-of-sight view to your target. This perspective puts your current
target in the center of the screen and lines it up with an external view of
your aircraft in the foreground.
|
|
Ctrl+F8
|
As
above, but reversed. Your aircraft appears in the middle of the screen, and
the target appears in the foreground.
|
|
F9
|
Switch
to the weapon camera view. You view everything from the weapon's
perspective, corresponding to the last weapon you fired.
|
|
Shift+F9
|
Show
a line-of-sight view from your weapon to your aircraft. This perspective
puts your weapon in the center of the screen and lines it up with an
external view of your aircraft in the foreground.
|
|
Ctrl+F9
|
As
above, but reversed. Your aircraft appears in the center of the screen, and
your weapon appears in the foreground.
|
|
F10
|
Display
an external, fly-by view. You see your aircraft make an approach, fly past,
and then exit your view.
|
|
F11
|
Display
the view from the nearest tower to your aircraft.
|
|
Numpad
+ / -
|
Zoom
the camera view in (+) or out (-). You can also use the wheel on your mouse
if it's equipped with one.
|
|
Alt+Arrow
keys
|
Pan
the view in the desired direction. You can also move the mouse in any
direction to pan.
|
|
Left
/ right mouse buttons
|
Zoom
the view in or out. This can be very useful for examining your aircraft
from an external camera view, or for reading dashboard instruments.
|
You can control your aircraft by using a joystick or the keyboard. If you
have a programmable joystick, many of the following functions can be assigned
to your joystick buttons and/or wheels.
Note that the aircraft takes a few seconds to respond to your flight
commands. Be careful not to over steer, or you may quickly get into trouble.
|
Left
/ right arrow keys
|
Roll
the aircraft (dips the wings) left or right.
|
|
Up
/ down arrow keys
|
Pitch
the nose of the aircraft up or down.
|
|
,
/ . (comma / period)
|
Turn
the rudder left and right. Alternatively, you can also use a rudder pedal.
|
|
=
/ - (not Numpad)
|
Increase
or decrease throttle. Note that you can also use an external throttle to
control speed.
|
|
F
|
Extend
flaps down by one notch. Most aircraft flaps have three settings.
Up (Retracted) - no extra lift (good for normal flight)
1/3 (Partially extended) - some extra lift (good for taking off and
avoiding stalls during tight or vertical maneuvers)
Down (Fully extended) - lots of extra lift and drag (good for landing)
|
|
V
|
Retract
flaps by one notch. Flaps are automatically raised after you reach a
certain speed in order to prevent damage.
|
|
S
|
Toggle
speedbrakes (extend/retract). Use your airbrakes in the air to quickly
bleed off speed.
|
|
B
|
Toggle
wheel brakes (engage/disengage). Use this command when landing to reduce
speed, but make sure you wait until you've touched down.
|
|
G
|
Raise/lower
landing gear.
|
|
Ctrl+L
|
Cycle
through external navigation light settings - off / flashing / steady.
|
|
Ctrl+I
|
Engine
Toggle. Turn engine on/off.
|
|
Shift+ESC
|
Eject
from the aircraft, ending the mission.
|
|
Backspace
|
Switch
to next Air-to-Air (A/A) weapon.
|
|
Shift+Backspace
|
Switch
to previous Air-to-Air weapon.
|
|
\
(backslash)
|
Switch
to next Air-to-Ground (A/G) weapons.
|
|
Shift+\
(backslash)
|
Switch
to previous Air-to-Ground weapon.
|
|
Spacebar
|
Fire
primary gun or cannon. You can also use joystick button 1 to fire.
|
|
Enter
|
Fire/release
currently selected missile, bomb, or rocket. You can also use joystick
button #2.
|
|
Ctrl+D
|
Jettison
(drop) external fuel tanks. You can do this to gain maneuverability, as
long as you have enough fuel to return to base.
|
|
Ctrl+J
|
Jettison
all external weapons except for A/A missiles.
|
|
'
(apostrophe)
|
Switch
to next gunsight mode - CAGE / Air-to-Air (A/A) / Air-to-Ground (A/G).
Whenever you select a new weapon, the proper gunsight mode auto-activates.
|
|
Shift+'
(apostrophe)
|
Switch
to previous gunsight mode.
|
|
]
|
Cycle
to next ripple setting. For bombs, this key determines the ripple setting,
or how many bombs are released at once when you press Enter. The number of
weapons per launch varies by aircraft.
|
|
Shift+]
|
Cycle
to previous ripple or salvo setting.
|
|
[
|
Cycle
to next ripple interval setting. This determines the time between each bomb
release when more than one bombs are rippled.
|
|
Shift+[
|
Cycle
to previous ripple interval setting.
|
|
;
(semicolon)
|
Cycle
to next gun group - usually 2 upper guns / 2 lower guns / all 4 guns. Some
aircraft have multiple gun groups or gun pods. Pressing this key activates
a different set of guns. When you press Spacebar, only the selected guns
will fire rounds.
|
|
Shift+;
(semicolon)
|
Cycle
to previous gun group setting.
|
|
Z
|
Toggle
electronic counter measures (ECM) on/off. For aircraft equipped with an
ECM, this can jam the enemy radar. However, it gives away your location to
the enemy.
|
|
X
|
Drop
Flare. For aircraft equipped with an decoy dispenser, flares can be
deployed to spoof incoming heat-seeking missiles.
|
|
C
|
Drop
Chaff. For aircraft equipped with an decoy dispenser, chaff can be deployed
to spoof incoming radar-guided missiles and break enemy radar lock-ons.
|
|
Ctrl+PgUp
|
Turn
radar off.. If the radar is off, pressing PgUp will turn it on.
|
|
PgUp
|
Switch
to next radar mode - Search / Boresight / Ground Map / Terrain Avoidance.
Note that not all modes are available on all aircraft. Additionally, the
Gameplay option settings can affect what you see on the radar. When the
radar is in Acquisition or Tracking mode, this key instead causes the radar
to revert back to its pre-acquisition setting (either Search or Boresight
mode).
|
|
Shift+PgUp
|
Cycle
to previous radar mode.
|
|
PgDn
|
Cycle
to next radar range setting. Note that different aircraft have different
radar ranges.
|
|
Shift+PgDn
|
Cycle
to previous radar range setting.
|
|
Home
|
Select
the next radar target on the radar display. Depending on your Gameplay
option settings, the radar target may only appear as a momentary blip
during each sweep. A target must be visible in order for the radar to enter
Acquisition mode.
|
|
Shift+Home
|
Cycle
to previous radar target on the radar display.
|
|
Insert
|
Acquire
and lock on the currently selected target. Acquisition mode is a
transitional mode between Search mode and Track mode. Once you initiate
acquisition, you lose all other radar contacts. When the radar is able to
acquire a full system lock, it enters Tracking mode. You can then fire your
radar-guided missile at the selected target.
|
|
Shift+Insert
|
Attempt
to acquire the current visual target. This slews the radar azimuth and
elevation in order to point at the visual target. If the target falls
within the radar constraints, the radar tries to enter Acquisition mode and
acquire that target.
|
|
Delete
|
Deselect
the current radar target. This key causes the radar to go back into Search
or Boresight mode. Note that you can also deselect a target by cycling
through radar modes.
|
|
T
|
Designate
the next enemy or unidentified aircraft as your visual target. This places
square brackets on the head-up display (HUD). If the target moves out of
view, the brackets turn into a cone that points in the direction of the
target. Additional target information may also appear in the lower right
corner of your viewscreen, depending on your HUD settings.
|
|
Shift+T
|
Select
previous enemy or unidentified aircraft as your visual target.
|
|
Ctrl+T
|
Select
closest enemy or unidentified aircraft as your visual target.
|
|
Y
|
Select
next friendly or neutral aircraft as your visual target.
|
|
Shift+Y
|
Select
previous friendly or neutral aircraft as your visual target.
|
|
Ctrl+Y
|
Select
closest friendly or neutral aircraft as your visual target.
|
|
E
|
Select
next enemy ground object as your visual target.
|
|
Shift+E
|
Select
previous enemy ground object as your visual target.
|
|
Ctrl+E
|
Select
closest enemy ground object as your visual target.
|
|
Numpad * (asterisk)
|
Target
the object closest to the center of view.
|
|
R
|
Target
the last object mentioned in the radio call - an enemy aircraft (bandit),
incoming missile, friendly bomber, airport, etc. For radio calls that do
not involve targetable objects, the caller of the object, if appropriate,
may be targeted. Some objects might not be visible or targetable.
|
|
Shift+R
|
Target
the caller of the last radio call, if appropriate.
|
|
Ctrl+R
|
Select
the current radar target as your visual target. You must have the target
selected on your radar, but you don't need a full lock to select this as a
visual target.
|
Misc. Commands
|
Shift+1
|
Animation
key 1 (for third-party add-ons).
|
|
Shift+2
|
Animation
key 2 (for third-party add-ons).
|
|
Shift+3
|
Animation
key 3 (for third-party add-ons).
|
|
Shift+4
|
Animation
key 4 (for third-party add-ons).
|
|
Shift+5
|
Animation
key 5 (for third-party add-ons).
|
|
Shift+6
|
Animation
key 6 (for third-party add-ons).
|
|
Shift+7
|
Animation
key 7 (for third-party add-ons).
|
|
Shift+8
|
Animation
key 8 (for third-party add-ons).
|
|
Shift+9
|
Animation
key 9 (for third-party add-ons).
|
|